

Saturday, 4 December 2010
Mental Golf: Eyes Wide Open
In order to achieve consistency on the putting green, a player’s perceptual motor skills must be fully engaged with the ‘read’ of the putt when he focuses on his ball-roll line. Good visual health, creative visualisation skills and obtaining reliable depth and distance judgment information are crucial to great putting. You must be able to read the slope of a green accurately, see your putting line clearly, and trust what your eyes are telling you before you step into the address position and stroke the ball.
BODY DRILLS
By showing people how to do body drills so that they could monitor body movement without a club and without their arms. What I did was just break the golf swing and the golf movements down into just what does the body do. I looked at the lower half of the body and the upper half of the body as separate units. Then what I have people do is just cross their arms on their chest and practice making just a turn and a finish, just practice making that simple move. A powerful move in golf happens in a very small area, but there is motion, and by that I mean as you go back into your back leg you will feel weight go into a braced and flexed right leg. That is something you monitor in front of a mirror so that you get set correctly. Also monitor your head movement. How far is your head moving to the right? Well it is going to either turn a little bit or move slightly to the right in the back move. But I don’t want it to move more than two or three inches. If you see yourself sliding your head very far back that would be a poor move, too much slide. On the other hand never make a move where you are turning into your left leg on the backswing. So when you do your body drill make sure you get loaded on your back leg. When you start down, start with a little knee shuttle, right knee, left knee, move something downstairs to get you started. Go through to a nice impact position and hold, and then go through to your finish position. The body drill can really help you understand how to get more power in your swing.
Friday, 9 April 2010
Reverse Pivot- DER DISTANZ KILLER
Reverse Pivot -
DER DISTANZ KILLER
TAUSENDE GOLFER LEIDEN UNTER „REVERSE PIVOT“ Was wie eine ansteckende Krankheit
klingt, ist für die Gesundheit vollkommen ungefährlich, für das Golfspiel allerdings eine kleine
Katastrophe. „Reverse Pivot“ bezeichnet die schwankende Bewegung während des Golfschwungs
und hat schlimme Auswirkungen auf Ihr Spiel.
Wahrscheinlich handelt es sich hierbei sogar um das häufigste Problem in der Golftechnik. Am schlimmsten daran ist, dass er ganz massiv das negativ beeinflusst, was sich alle Golfer am meisten wünschen: Schlaglänge! Wenn man die „Longhitter“ der PGA Tour anschaut, sieht man dort keinen, der seinen Körper nicht richtig dreht und zudem sein Gewicht nicht korrekt verlagert.
Wie Sie es von uns gewohnt sind, werden wir Ihnen erstmal zeigen, wie dieser Fehler aussieht (damit Sie sich vielleicht wieder erkennen) und Ihnen danach erklären, warum man genau was technisch falsch macht und wie Sie diesen Fehler beheben können. Eine Reihe physischer Tests und Übungen wird Ihnen schnell helfen, dem Problem vorzubeugen oder ihm erfolgreich entgegen zu wirken!


 RICHTIG
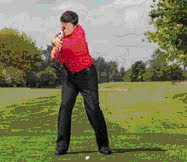
Der Oberkörper neigt sich im Aufschwung in Richtung Ziel (falsch!). Richtig wäre, das Gewicht im Aufschwung auf das rechte Bein zu verlagern. Der Oberkörper neigt sich nicht über das rechte Bein (wie in der Ansprechposition), weil es scheinbar bequemer ist, der Körperspannung auszuweichen. Würde man sich um die Wirbelsäule drehen, wäre dieser Schwungfehler gar nicht möglich. Da sich im Golf die rechte Hand unterhalb der linken befindet, sind wir in der Ansprechposition automatisch etwas vom Ziel weg geneigt. Dies gilt es eigentlich nur beizubehalten so dass sich das Körpergewicht von fast alleine nach rechts verlagert. Hier ist dieses nichtpassiert, stattdessen ist aus einer der 3 Hauptursachen das Gewicht links geblieben:


DER DISTANZ KILLER
TAUSENDE GOLFER LEIDEN UNTER „REVERSE PIVOT“ Was wie eine ansteckende Krankheit
klingt, ist für die Gesundheit vollkommen ungefährlich, für das Golfspiel allerdings eine kleine
Katastrophe. „Reverse Pivot“ bezeichnet die schwankende Bewegung während des Golfschwungs
und hat schlimme Auswirkungen auf Ihr Spiel.
Wahrscheinlich handelt es sich hierbei sogar um das häufigste Problem in der Golftechnik. Am schlimmsten daran ist, dass er ganz massiv das negativ beeinflusst, was sich alle Golfer am meisten wünschen: Schlaglänge! Wenn man die „Longhitter“ der PGA Tour anschaut, sieht man dort keinen, der seinen Körper nicht richtig dreht und zudem sein Gewicht nicht korrekt verlagert.
Wie Sie es von uns gewohnt sind, werden wir Ihnen erstmal zeigen, wie dieser Fehler aussieht (damit Sie sich vielleicht wieder erkennen) und Ihnen danach erklären, warum man genau was technisch falsch macht und wie Sie diesen Fehler beheben können. Eine Reihe physischer Tests und Übungen wird Ihnen schnell helfen, dem Problem vorzubeugen oder ihm erfolgreich entgegen zu wirken!

FALSCH

 RICHTIG
 So sieht ein „Reverse Pivot“ aus
Der Oberkörper neigt sich im Aufschwung in Richtung Ziel (falsch!). Richtig wäre, das Gewicht im Aufschwung auf das rechte Bein zu verlagern. Der Oberkörper neigt sich nicht über das rechte Bein (wie in der Ansprechposition), weil es scheinbar bequemer ist, der Körperspannung auszuweichen. Würde man sich um die Wirbelsäule drehen, wäre dieser Schwungfehler gar nicht möglich. Da sich im Golf die rechte Hand unterhalb der linken befindet, sind wir in der Ansprechposition automatisch etwas vom Ziel weg geneigt. Dies gilt es eigentlich nur beizubehalten so dass sich das Körpergewicht von fast alleine nach rechts verlagert. Hier ist dieses nichtpassiert, stattdessen ist aus einer der 3 Hauptursachen das Gewicht links geblieben:


ÜBUNG 2
Übung 1
Stellen Sie Ihr Golfbag neben das rechte Bein und drehen den Körper auf – ohne das Bag zu berühren – bis die linke Schulter in einer fast senkrechten Linie über dem rechten Knie ankommt. Sie werden schnell feststellen, dass das ohne Kopfbewegung ziemlich anstrengend ist. Wiederholen Sie diese Bewegung ein paar Mal bevor Sie dann auch noch einen Golfball während der Drehung anschauen, bestimmt werden Sie merken, dass Sie den Ball aus einem anderen Winkel betrachten als Sie das bisher getan haben.
Übung 2
Stellen Sie sich mit einem Golfschläger vor einen Spiegel. Machen Sie einen halben Schwung nach rechts und kontrollieren Sie, ob der Rücken tatsächlich vom Ziel weggeneigt ist, dann schwingen Sie halb durch und verlagern Sie das komplette Gewicht auf die linke Seite. Wieder machen Sie einige Trockenschwünge bevor Sie es mit einem Ball probieren.
Monday, 22 March 2010
OVER THE TOP (Deutch)
Eine ganz krumme Sache:
OVER THE TOP!
FALSCH

RICHTIG

Wir stellen Ihnen hier zwei Übungen vor, um künftig die „Over the top“-Bewegung zu vermeiden und Ihren Schwung zu verbessern:
1 Geben Sie der richtigen Schwungebene eine Chance hier zeigt, wie es funktioniert:Stellen Sie einfach Ihr Golfbag oder etwas Ähnliches (etwa die Lehne eines Stuhls) an Ihr Hinterteil. Sie müssen während des kompletten Schwungs Kontakt mit dem Bag halten. So können Sie die Bewegung nach vorne effektiv einschränken. Zudem können Sie auch die rechte Handfläche unter dem Schaft positionieren, um so zu fühlen, wie der Schläger abflacht.


OVER THE TOP! (English)
For many slicing is a torment, which we try in vain to conquer. Some regard it as a virus, from which they suffer for years on end. No matter, how you describe a slice – it is sadly true that nearly 90% of all club players produce this type of curve all too regularly. Probably the reason why there are many more tips to cure the slice than any other problem shot.
WRONG


WRONG

But why do we all still slice the ball still? In this article we will look at some of the aspects of the slice, some of which you may well have never heard. The title of this article is „Over the Top “. Which brings us neatly to the problem. This means that the golf club does not swing down parallel on the original plane line, rather in the downswing the club is further forward from the body (steeper shaft plane) resulting in the club coming from “out to in”. This swing path produces rotational spin on the ball allowing the ball to curve to the right in the air. The birth of the Slice! CORRECT

1 correct and wrong - do you recognize the difference? The most important position for all Slicer’s is halfway in the downswing. In the picture right Im showing the correct position of the club. In the next picture above you can see the problem of most Slicer’s - the club is clearly too far in front of the body with a too steep shaft plane. This swing path will cause a Slice or a Pull. Look carefully: Not only the golf club moves forward, but also the entire body loses the original angles during the swing. As most people always look at the movement of the club, and never the movement that the body is making, as this is important in the causing of a slice, which however hardly, if at all, once addressed.
Here are two exercises for you, in order to avoid going „Over the top “and improve your swing for the future:
1 Give your swing plane a chance Here I will show you, how it works: Place your golf bag or something similar (for instance take a chair and place the back of the chair) against your bum. During your swing your bum must stay in contact with the bag. So this maintains the hip angle and allows the club a chance to swing on the correct plane. 2. You can also place the palm of the right hand under the shaft in order to feel the way the club flattens.

Wednesday, 17 March 2010
Short Game Revolution and Pod Cast
This week I have joined up with my colleagues in Timmendorfer Strand and we have been talking about some interesting subjects over the Short Game and How to Practice!
So take a look at this:
P&P Pod Cast 11 in 2010
http://www.youtube.com/watch?v=237P67pCRpo
Since January 2010 the David Leadbetter Academy in Germany have set-up a Short Game Revolution web-site, because we all feel that the short game is vital for the improvement of every golfer to reach there full potential. This is because for too long the short game has been neglected. There have been huge developments in the full swing, technology and fitness but still average scores worldwide are not coming down. Golfers are not getting better, in fact many leave the game through frustration on the now 7000yd+ courses.
ShortGameRevolution
http://www.shortgamerevolution.com/
Tuesday, 9 March 2010
Bunker Play
The fundamentals

 During the backswing the club should flow and have good tempo, the club face rotates slightly open by its own acord due to the butterfly grip to promote that high soft flight.
 During your swing the body rotates back and, evenly more important, through!! during the forward swing, so that the club can return square at impact, while the feet and legs work with the body rotation through to the end of the swing.

Set up to the ball square with your left foot turned out. The ball should be positioned inside the left heel with the ball position line running through your left breast and ear (seen in photo 1), a line drawn from the middle of your sternum should be positioined 1 inch behind the ball. This allows the bodyweight to be slightly left in the set up. The shaft of your club should be vertical to allow the bounce to do its job through impact. The knees are pressed towards the target to encourage leg work through the shot. To allow a high soft landing shot try out the butterfly grip (left hand should be in a strong position on the club, you should see at least three knuckles on the back of your left hand. The right hand is placed in a weak postion on the club, the V between your right fore finger and thumb should point towards your left ear).


Wednesday, 3 March 2010
Pitching
Back to Basics
The pitch shot is little more than an elongated chip. The fundamentals are exactly the same as the chip, and the swing technique is based on the same philosophy. So how is a pitch different than the basic chip? The difference is the length and speed of the swing, which ultimately makes it possible to produce a wider variety of shots than is possible with the chipping motion. The pitching swing is longer in the terms of your arm swing, wrist cock, shoulder turn and footwork. As a result, you generate much more clubhead speed. When you add speed to the equation, a new world opens up in terms of what you can do with the ball. With speed comes the possibility of increasing your backspin, hitting the ball higher than normal and producing good shots from difficult lies. The pitch includes high, soft shots from around the green as well as the half wedge from 20 to 35 meters – a shot that causes most amateurs to become nervous.

 Here I’m playing a 25 meter shot to my target. Align with your stance and wedge squarely at the target and position the ball just inside the left heel, the shaft should be fairly vertical this is to use the bounce on the sole of the club, which maintains the loft of the club, and stops the club face from shutting during the backswing, and the leading edge of the club digging into the ground during impact. The bodyweight should be positioned towards the left side in the address position so that the middle of the sternum is in line over the ball.

 Here are three different lofted wedges 48’ 53’ and 58’ it is important select the appropriate combination of gap, sand and lob wedges to provide you with the proper short game distance control.What is bounce on a wedge? Bounce is built into the sole of a wedge to keep it from digging into the turf or sand. The greater the bounce, the more the sole resists digging. Bounce helps prevent "fat" shots by keeping the club moving through the turf or sand.Having enough bounce is particularly important on all shots. Too much bounce can make shots from firm conditions more difficult to execute.

The pitch shot is little more than an elongated chip. The fundamentals are exactly the same as the chip, and the swing technique is based on the same philosophy. So how is a pitch different than the basic chip? The difference is the length and speed of the swing, which ultimately makes it possible to produce a wider variety of shots than is possible with the chipping motion. The pitching swing is longer in the terms of your arm swing, wrist cock, shoulder turn and footwork. As a result, you generate much more clubhead speed. When you add speed to the equation, a new world opens up in terms of what you can do with the ball. With speed comes the possibility of increasing your backspin, hitting the ball higher than normal and producing good shots from difficult lies. The pitch includes high, soft shots from around the green as well as the half wedge from 20 to 35 meters – a shot that causes most amateurs to become nervous.

 Here I’m playing a 25 meter shot to my target. Align with your stance and wedge squarely at the target and position the ball just inside the left heel, the shaft should be fairly vertical this is to use the bounce on the sole of the club, which maintains the loft of the club, and stops the club face from shutting during the backswing, and the leading edge of the club digging into the ground during impact. The bodyweight should be positioned towards the left side in the address position so that the middle of the sternum is in line over the ball.
 Here are three different lofted wedges 48’ 53’ and 58’ it is important select the appropriate combination of gap, sand and lob wedges to provide you with the proper short game distance control.What is bounce on a wedge? Bounce is built into the sole of a wedge to keep it from digging into the turf or sand. The greater the bounce, the more the sole resists digging. Bounce helps prevent "fat" shots by keeping the club moving through the turf or sand.Having enough bounce is particularly important on all shots. Too much bounce can make shots from firm conditions more difficult to execute.

Wednesday, 24 February 2010
Tips for Winter Training
FROM THE TEE
Alignment
Never assume the mat is pointing in the right direction. Use a pre-shot routine that makes sure you are lined up correctly.
Solid base
Especially in windy conditions and off the mats. Widen your stance and keep the lower half of your body quiet.
Keep it straight
You’ll get less run in the winter. Try a fairway wood to improve consistency and you won’t lose all that much distance.
IRON PLAY
Grade your lie
Stand with your back to the flag and “grade” your lie. Think traffic lights – attack (green), lay up (yellow) or knock out sideways (red).
Mud ball
Take more club than usual and swing easy to reduce spin and help keep it online.
SHORT GAME
Get it rolling
Use a rescue club or fairway wood on temporary greens and putt how you would normally.
Keep it low
The chip and run reduces the chances of mis-hits and unpredictable bounces – compared to the high, lob shot.
Wet sand
The lob wedge can be very useful. Make a smooth, shallow swing. You don’t need to open the face or your stance.
Friday, 5 February 2010
Putting tip for Rhythm
To begin finding your putting rhythm, comfortably walk for one minute (60 seconds) taking normal steps, timing yourself with a stopwatch and counting your steps. Do not rush or dawdle, just walk at your normal pace. Do it a few times and take an average of the number of steps you normally take per minute. Now take that number of steps per minute, subtract 70, and then double the number. (Ex: Walking at 110 steps per minute = (110-70) x 2 = 80). This “initial base rhythm" is measured in beats per minute and will correlate to the rhythm of your putting stroke back and through, like the tempo of a metronome. It may not be your final putting rhythm, but it is a starting point for finding it. Get a metronome, set it at 80 beats per minute, and feel your putting stroke as you putt to that rhythm. Close your eyes and adjust your stroke rhythm (change the metronome setting up or down) from there until the putting stroke feels almost effortless. As you work with a metronome and rhythm drills, remember to stroke all of your putts, from two-footers to 100-footers, at the same rhythm. If you can execute this rhythm in a pendulum motion, you will eliminate most of the sources of variability in putting.
Tuesday, 19 January 2010
Pre-shot Routine (Tip)
After making all of your pre-shot decisions – what shot to hit, how to swing and with what club – the next step is to focus on visualizing the look and feel of the perfect swing. The goal of this preparation process is to see and feel the exact swing you are going to make before you try to make it happen for real. One or two practice swings may or may not be enough. Your last practice swing should feel exactly right for the shot you want to hit. If it feels right, you are ready to go; if not, make another one, two, or three swings as necessary, until you are completely comfortable. When your mind’s eye says, “Yes, that’s the swing I want, that’s my ‘perfect preview swing’,” lock onto that image. With the look and feel of the perfect swing fresh in your mind and muscles, you are ready to move into your address position, start your pre-shot ritual (waggle) and hit the shot.
Tuesday, 12 January 2010
Statement of the week
Research has proven that golfers lose almost 80 percent of their shots to par inside of 100 yards from the hole. To that end, our golf school curriculum focuses strictly on what I define as “The Scoring Game,” a combination of the short game (distance wedges, pitching, chipping, sand play) and putting, which comprise 60 to 65 percent of the total number of shots played per round. From three-foot putts to full wedge and long bunker shots, at this truly unique golf school, you’ll learn to properly execute shots from any scoring position.
If you have difficulty controlling distance when you face short shots, it may be because you find a small, delicate swing with a short backswing to be a more difficult swing to make than a long backswing. Research shows this to be true for any level of player. One problem with the short backswing is that there is not much time to get your body parts synchronized. It is the same feeling you may have over very short putts: You jab with the hands because you feel there is not enough time to get the flow and rhythm of the stroke.
If you have difficulty controlling distance when you face short shots, it may be because you find a small, delicate swing with a short backswing to be a more difficult swing to make than a long backswing. Research shows this to be true for any level of player. One problem with the short backswing is that there is not much time to get your body parts synchronized. It is the same feeling you may have over very short putts: You jab with the hands because you feel there is not enough time to get the flow and rhythm of the stroke.
Subscribe to:
Posts (Atom)